Branded Links
Branded links allow you to use your own domain for links and QR Codes instead of a generic Print.one link (scan-my.link). This makes your brand instantly recognizable and increases your target audience's trust.
We will show you step-by-step how to:
-
Add your domain in the Print.one dashboard
-
Set up DNS records with your domain registrar
-
Solve common problems
Overview
Branded links use your own domain (e.g., go.mybrand.com) instead of the generic Print.one URL (scan-my.link). This strengthens your brand identity and increases customer confidence when scanning your QR codes.
What you will generally do:
-
Add your domain in the Print.one dashboard to link your branded link to your account
-
Configure your DNS records with your domain registrar (e.g., GoDaddy, Cloudflare, Namecheap)
-
Solve common problems and learn what to do if something doesn't work as expected
Before you start
Before you start creating a branded link, make sure you have the following:
-
Access to the branded link feature, as it is in early access mode. Request this from our support team.
-
An active domain
-
Access to your domain registrar's control panel
Note: Some DNS changes work within seconds, but it can take 1 to 48 hours for them to be implemented worldwide.
Warning: Be careful; changing the wrong DNS settings can have serious consequences.
Step 1: Add Your Domain
To use your (sub-) domain with Print.one, you’ll need to add it to your account and verify ownership. Follow these steps to get started.
1.1 Access Your Print.one Dashboard
-
Log in to your Print.one account.
-
Navigate to the Branded Links section. You can find this under Settings > Company > Branded Links .
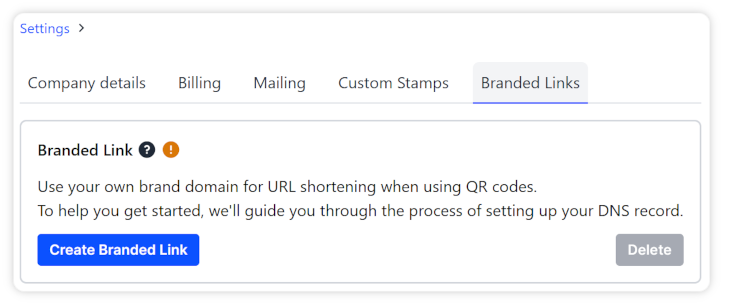
1.2 Add Your Domain
-
Click “Create Branded Link” to start the process.
-
Enter the domain name you want to use (e.g.,
go.mybrand.comormybrand.com) in the provided field.
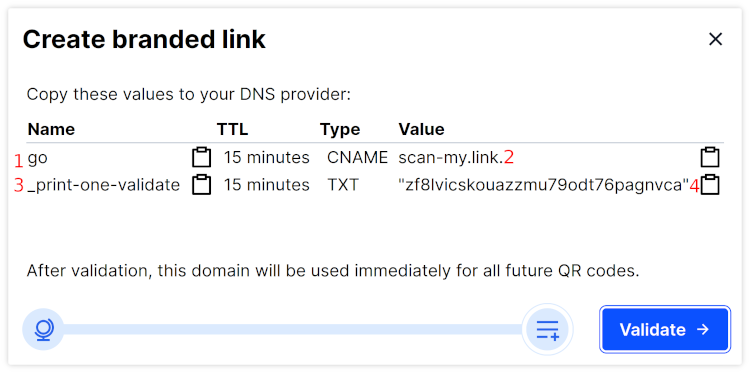
Step 2: Configure Your DNS Records
To point your domain to Print.one, you must add specific DNS records through your registrar’s control panel. The steps below provide a general guide that applies to most registrars.
2.1 Login and navigate to DNS management
-
Log in to your domain registrar’s website.
-
Navigate to your domain's DNS management section. This section might be labeled “DNS Settings,” “Manage DNS,” or “Domain Management.”
When you have entered a subdomain like go.mybrand.com, go to step 2.2.a. Skip 2.2.b and continue with 2.3.
When you have entered an entire domain like mybrand.com, go to step 2.2.b. Skip 2.2.a and continue with 2.3.
 ****
****
2.2.a Add a CNAME Record
-
Type: Choose CNAME .
-
Name/Host: Enter the subdomain used in the Print.one dashboard ( value 1 ).
-
Value/Target: Enter the exact value: scan-my.link. (notice the period at the end) ( value 2 ).
-
TTL: Use the default setting, but 5 minutes is fine.
 2.2.b Add an A Record
-
Type: Choose A .
-
Name/Host: Enter @ to indicate your main domain.
-
Value/Target: Enter the exact value: 34.110.187.87
-
TTL: Use the default setting, but 5 minutes is fine.
-
Bonus: if you want to match any undefined subdomain, add the same A record but with Name/Host ******* .
 2.3 Add a TXT Record for Domain Verification
-
Type: Choose TXT .
-
Name/Host: Usually “_print-one-validate” or as specified ( value 3 ).
-
Value: Enter the verification code provided by Print.one exactly as given ( notice the quotes around the value ) ( value 4 ).
-
TTL: Use the default value, but 5 minutes is fine.
 2.4 Save your changes and **** return to the Print.one dashboard
Remember: DNS changes may take some time to take effect. If your domain doesn’t verify immediately, please wait a bit (from 1 second up to 48 hours sometimes).
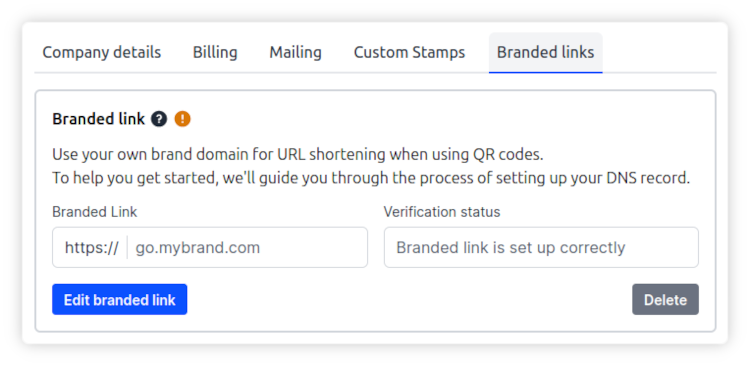
Step 3: Verify Your Domain
After adding the DNS records, you can verify your domain in the Print.one dashboard. If the verification fails, follow the troubleshooting steps below.
3.1 Check the Verification Status
-
Return to the Branded Links section.
-
Click the "Validate" button. If the status is:
-
“Branded link is set up correctly”: Your domain is ready to use.
-
“Invalid domain” / "Domain is not valid": The domain provided in step 1.2 is incorrect. Please check if your input is a valid domain.
-
"A record does not match": Check your domain registrar to ensure you entered the correct values. If it has the proper values, go to the troubleshooting question about DNS propagation.
-
"Domain has no TXT record" / "TXT record does not match": Check your domain registrar to ensure you entered the correct values. If it has the proper values, go to the troubleshooting question about DNS propagation.
Troubleshooting & FAQ
Q: My domain isn’t verifying. What should I do?
-
Wait for Propagation: DNS changes can take up to 48 hours to update globally.
-
Double-check your entries: Verify that you’ve entered the DNS record values exactly as provided, no extra spaces or incorrect characters.
-
Separate Domains: For branded links, it’s best to use a subdomain (go.mybrand.com) or a dedicated domain (go-brand.com).
Q: I’m getting an error about record conflicts.
-
Check Existing Records: If an A record exists for the same host, remove it before adding your CNAME.
-
Consult Your Registrar: Some registrars have specific rules. Refer to your registrar’s help articles for guidance.
Q: How do I know when the DNS changes have taken effect (propagation) ?
-
Use Online Tools: Tools like whatsmydns.net or dns.google can help check DNS propagation.
-
Clicking on the "Validate" button another time will also recheck the DNS.
Need More Assistance?
If you feel uncomfortable with any steps or if problems persist, please don’t hesitate to contact us on support.print.one.